

I have to admit, I am not entirely sure what this look is. I was planning on doing a Morticia Addams look (there will be a little sneak peak on Friday) but I realised that it was pretty similar to Poison Ivy, just using different colours, so I tried again the next day to make it more dramatic and came up with this. I think I will go for witch, but it has a touch of the zombie about it too.
I apologise for how patchy the skin is - note to self (and all of you guys), use proper face paint (I have heard good things about Snazaroo).
 First apply a matte or velvet-finish primer to give the paint something to stick to. My face paint was so rubbish I had to also apply foundation first, and perhaps should have just left it there (it's not like I'm not pale enough...) then sponged the face paint over the top. Whatever face paint you're using, the most important thing is to dab it on rather than wipe with the sponge, because this gives the best finish.
Then some contouring - grey eyeshadow is best for this to make it spooky and not flattering, and you can go quite strong with this. I applied using a blusher brush as normal, but more extreme than usual. Then with the white eyeshadow I went over the top of the cheekbones, and also covered my lids right up to the brow bone and all under the eye as well, which you might need to do if you're worried about getting face paint too close there.
 Next I took the grey eyeshadow over the socket and out in a wing. This wasn't hugely obvious but helps to show where the next layer goes. After that layer comes the black eyeshadow, which in the photos looks quite grey. The one I used wasn't amazing, but I think it keeps it looking more zombie-y and less panda-y. I took this from the outer corner of my eye two-thirds of the way across my crease then back and under the eye. As per, do what suits your eye shape! I kept it in a wing shape to elongate my eyes.
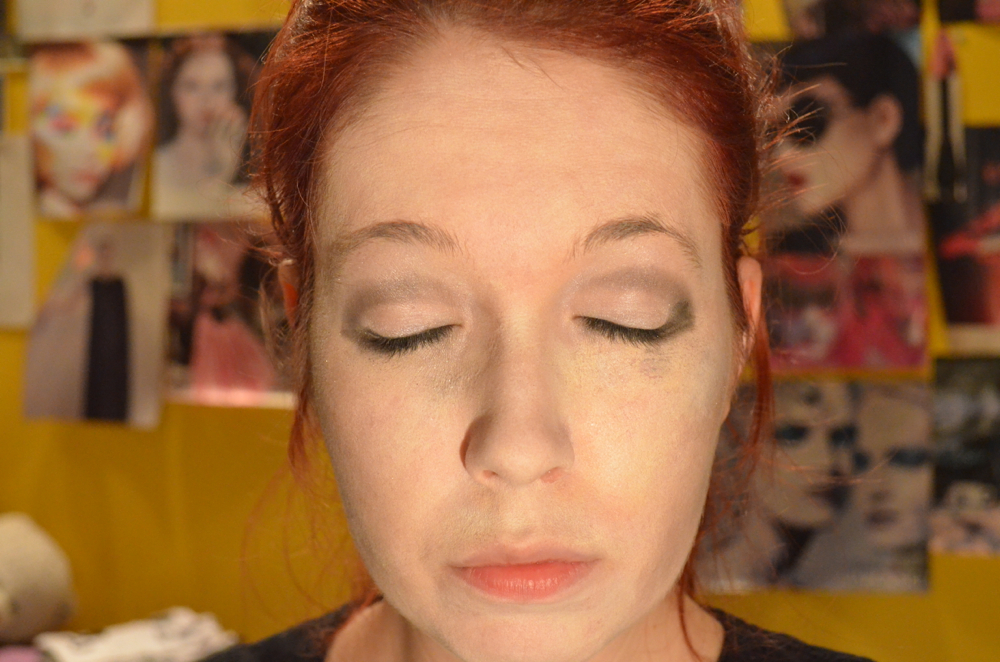
To make this more sophisticated and a bit less zombie, I lined my eyes with liquid eyeliner, again all along the upper lashline out into a flick, but then I was actually brave and took it all the way along underneath too, and it looked ok! I was very pleased about this. I think the key with small eyes is to make sure you don't join up the lines on the inner corner. If you have beautiful big eyes like Noll, you can take it all the way round. Incidentally here I would also say, I should have used a white eyeliner in my waterline, you could do that or, again if you have big eyes, a black eyeliner.

The eyes were mostly done at this point so I got my black eyeshadow back and this time used it to fill in my eyebrows. You want them to be quite dramatic (hence the black...) but the black mostly does this for you, so while I made sure I had a good arch, I didn't go too thick. I think unless you already have thick, dark, arched brows, there is not much point using a pencil here, I really would just go in with the eyeshadow powder. For definition, an eyeliner brush can be quite good to do an outline which you then fill in.

After this I just finished off with lots of mascara but false lashes would be good too! Then before doing my lipstick I made sure everything else was done - you can see the bottom three pics have stronger contouring on the cheeks because I decided it wasn't quite enough. If you were just using foundation, not face paint, here would also be a good point to set everything with powder.
Now onto the lips, my favourite part! I tried this with and without foundation underneath, and I would recommend with I think, at least if you're using a cheap-ish lipstick like me. It basically depends how opaque your lipstick is - with this one I found that foundation underneath made it come out more purple than pink, which I think is best for this look. If you want to go for a pure black lipstick then I would recommend the Barry M one I think. After applying your first layer of lipstick, blot with a tissue, and repeat several times to build it up enough, and then you're done!
If you're going to a party, now would also be a good time to spray your whole face with hairspray, if you're not posh enough to have the fancy Urban Decay setting spray (I'm not).

Finish the look off with black hairspray or a black wig, and then pile on as many black clothes as you can and add broomstick, witch hat, small black cat etc.
Products used:
Rimmel Stay Matte Primer
Maybelline SuperStay Foundation
Awful neon pretend face paint - use this instead
No7 Eyeshadow trio with white, grey and black
Bourjois Volume 1 Seconde Mascara
Bourjois Liner Clubbing Ultra Black liquid eyeliner
e.l.f. Studio High Definition Powder
NYX Lipstick in Black Cherry
Great tutorial! I love the finished look! I wish we celebrated Halloween in Australia :( x
ReplyDeleteAngela | The Sunday Chapter
Thank you so much!
Delete:O I can't believe you don't celebrate it?! I never knew that. Maybe you could be a Christmas witch...?
Poppy x
Hey girl! I've nominated you for a Liebster Award! Head on over to my blog to see what you have to do. :)
ReplyDeletehttp://www.cestlaviesaidshe.com/
Have fun!
Thank you so much!
DeletePoppy x
Looks so good hun well done, keep up the good work I always look forward to reading your posts.
ReplyDeleteI don;t know why but when you comment on my Blog I can never reply to you xox
http://rainbowsandunicorns27.blogspot.co.uk/
Thank you so much, that is so lovely to hear! What a sweetie :)
DeleteHow weird you can't reply, I have massive problems trying to comment on people's blogs too sometimes though, especially with blogger, such a pain!
Poppy x